

Note: Your are not logged in. We can not keep your scores or track your progress unless you Register and Log In
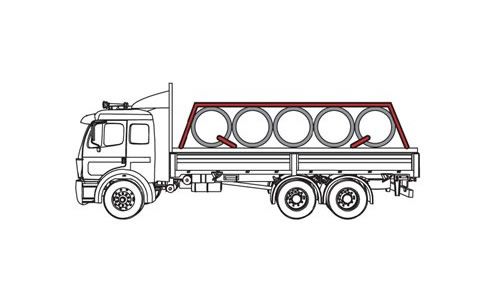
Securing Pipe with an Inside Diameter Up to 1143 mm (45 in)
Concrete pipe with an inside diameter up to 1.143 m (45 in) can form a complete single tier on a typical flatbed vehicle. Larger pipe often can only be carried as a partial tier.
Note: This pipe diameter of 1.143 m (45 in) is simply a convenient breaking point between "medium" and "large" diameter pipe.
Note: At least one tie-down through the front pipe of the bottom tier must run rearward at an angle not more than 45 with the horizontal when viewed from the side of the vehicle, when ever practical.
At least one tie-down through the rear pipe of the bottom tier must run forward at an angle not more than 45 with the horizontal when viewed from the side of the vehicle, when ever practical.
Requirements for stabilizing the bottom tier
Arrange the load properly
Immobilize the front and rear pipe with on of the following elements.
- Blocking
- Wedges
- Vehicle end structure
- Stakes
- Locked pipe unloader
- Other equivalent means
Tie-down requirements
- Pipe may be secured individually or as a group.
- Tie-downs through the pipe must be chains.
- Front-to-back tie-downs may be chain or wire rope.
Individually
Run a tie-down though the pipe.
As a group
Place lengthwise tie-downs over the group of pipes:
Either one 13 mm (1/2 in) chain or wire rope,
Or two 10 mm (3/8 in) diameter chain or wire rope
Place one crosswise tie-down for every 3.0 m (10 ft) of load length.
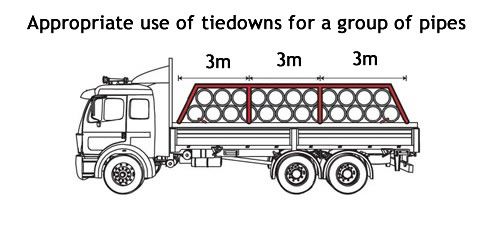
Either attach the side-to-side tie-down through a pipe
Or pass the tie-down over both front-to-back tie-downs between two pipes on the top tier.
Multiple-Choice Questions:
When securing concrete pipe with a diameter up to 45 inches loaded crosswise as a group, a crosswise tiedown should be used every how many feet?
- 6
- 10
- 15
- 3
As a group
Place lengthwise tiedowns over the group of pipes:
Either one 13 mm (1/2 in) chain or wire rope,
Or two 10 mm (3/8 in) diameter chain or wire rope
Place one crosswise tiedown for every 3.0 m (10 ft) of load length.

Either attach the side-to-side tiedown through a pipe
Or pass the tiedown over both front-to-back tiedowns between two pipes on the top tier.
Concrete pipe loaded crosswise generally:
- All of these things apply.
- Note: At least one tiedown through the front pipe of the bottom tier must run rearward at an angle not more than 45 with the horizontal when viewed from the side of the vehicle, when ever practical.
- At least one tiedown through the rear pipe of the bottom tier must run forward at an angle not more than 45 with the horizontal when viewed from the side of the vehicle, when ever practical.
- Concrete pipe with an inside diameter up to 1.143 m (45 in) can form a complete single tier on a typical flatbed vehicle. Larger pipe often can only be carried as a partial tier.
Special Circumstances: Securing Pipe with an Inside Diameter Up to 1.143 mm (45 in)
Concrete pipe with an inside diameter up to 1.143 m (45 in) can form a complete single tier on a typical flatbed vehicle. Larger pipe often can only be carried as a partial tier.
Note: This pipe diameter of 1.143 m (45 in) is simply a convenient breaking point between "medium" and "large" diameter pipe.
Note: At least one tiedown through the front pipe of the bottom tier must run rearward at an angle not more than 45 with the horizontal when viewed from the side of the vehicle, when ever practical.
At least one tiedown through the rear pipe of the bottom tier must run forward at an angle not more than 45 with the horizontal when viewed from the side of the vehicle, when ever practical.
When securing concrete pipe with a diameter up to 45 inches loaded crosswise as a group,lengthwise tiedowns should be either one 1/2 in chain or wire rope, or:
- Two nylon straps with aggregate WLL of 50% the weight of the load.
- One 3/8 inch chain or wire rope.
- Two 1/4 inch chains or wire ropes.
- Two 3/8 inch chains or wire ropes.
As a group
Place lengthwise tiedowns over the group of pipes:
Either one 13 mm (1/2 in) chain or wire rope,
Or two 10 mm (3/8 in) diameter chain or wire rope
When securing concrete pipe up to 45 inches loaded crosswise, tiedowns through the pipe must be:
- Wire.
- Chains
- Nylon rope.
- Straps.
Tiedown requirements
- Pipe may be secured individually or as a group.
- Tiedowns through the pipe must be chains.
- Front-to-back tiedowns may be chain or wire rope.
Complete!
You can Return To The Table Of Contents


Why Join Trucking Truth?
- The High Road Training Program
- The High Road Article Series
- The Friendliest Trucker's Forum Ever!
- Email Updates When New Articles Are Posted
Apply For Paid CDL Training Through TruckingTruth
Did you know you can fill out one quick form here on TruckingTruth and apply to several companies at once for paid CDL training? Seriously! The application only takes one minute. You will speak with recruiters today. There is no obligation whatsoever. Learn more and apply here:
 TT On Facebook